This Keto Walking Taco Casserole is an easy low carb appetizer! The pork rinds are deliciously scoop-able, plus cheesy beef in every bite! Keto Walking Tacos for a Crowd My Keto Walking Taco Casserole is really just a simplified version of walking tacos…but for a crowd. It’s similar to nachos, but you don’t melt the […]
Air Fryer Tajin Chicken Wings
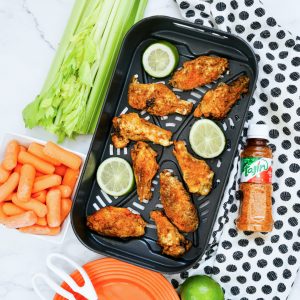
My crispy Air Fryer Tajin Chicken Wings will make your mouth water with the perfect blend of lime, chili, and butter. Perfect for the big game, but simple enough for dinner any night of the week. Air Fryer Tajin Chicken Wings I’ll admit it. I’m a huge chicken wing junkie. And I’ve passed my love […]
Keto Nashville Hot Chicken Sandwiches {Low Carb – Gluten Free}
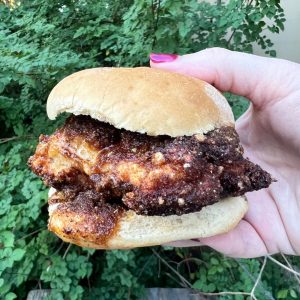
These keto Nashville Hot Chicken Sandwiches are so delicious with the perfect blend of sweet and heat that everyone will love. They are keto friendly, low carb, carnivore, and gluten free. Keto Nashville Hot Chicken Sandwiches I fell in love with Nashville Hot Chicken Sandwiches several years ago (before I switched to a keto lifestyle) […]
Keto Valentine’s Shooter Desserts

Make these Keto Valentine’s Shooter Desserts for your Valentine this year! They are so decadent with cream cheese, heavy cream, strawberries, and a splash of vanilla. KETO VALENTINE’S SHOOTER DESSERTS These strawberry cheesecake Valentine dessert shooters will be the easiest dessert you make this year. This dessert is keto friendly, sugar free, low carb, gluten free, and […]
Keto Pretzel Bites
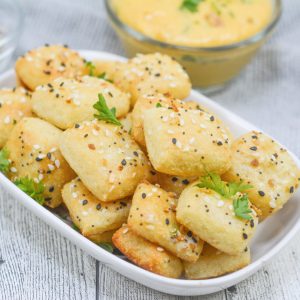
Keto Pretzel Bites are the perfect addition to a snack board or to dip in Keto Beer Cheese. They are light, fluffy, and perfect on a low carb diet. Keto Pretzel Bites These soft pretzel bites are always a hit at my house. They cook up quickly and use ingredients you probably already have on […]
Keto Beer Cheese
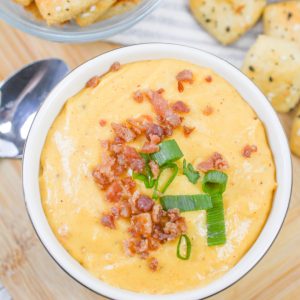
Need a delicious appetizer? My keto Beer Cheese will be the talk of the party, but without all those pesky carbs. Just a few simple ingredients and 30 minutes is all you need. Keto Beer Cheese Dip I’m always trying to come up with creative appetizers or potluck recipes that everyone will love, but that […]
Air Fryer Pork Chops (Keto & Gluten Free)
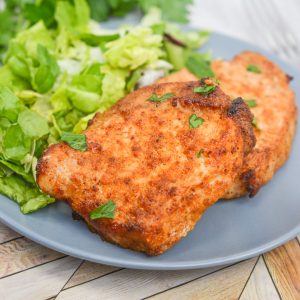
Dinner will be on the table in less than 30 minutes with my Air Fryer Pork Chops recipe. They are tender, juicy, and a hit with the whole family. Keto Friendly Pork Chops in the Air Fryer I’m always looking for simple, quick recipes that I can get on the dinner table in under 30 […]
Keto White Chocolate Christmas Shooters
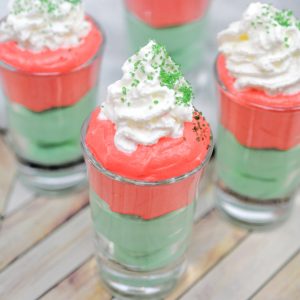
Add these Keto White Chocolate Christmas Shooters to your Christmas dessert table! They are so decadent with white chocolate, heavy cream, and a splash of vanilla. Keto White Chocolate Christmas Shooters These Christmas dessert shooters will be the easiest dessert you make this year. This dessert is keto friendly, sugar free, low carb, and diabetic […]
Filet Mignon with Goat Cheese Sauce (Keto – Low Carb)
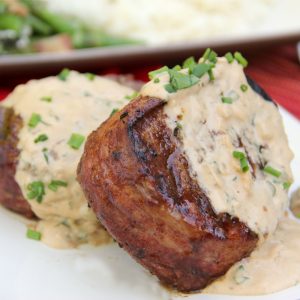
Celebrate any day with a delicious filet mignon drizzled with a rich goat cheese sauce for a truly decadent meal that’s keto and low carb friendly. Filet Mignon with Goat Cheese Sauce (Keto – Low Carb) When it’s my turn where we go for date night, I almost always pick a steakhouse. The quality of […]
Air Fryer Spiced Salmon (Keto Friendly Recipe)
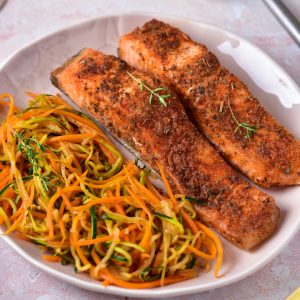
Add this simply seasoned Air Fryer Spiced Salmon to your menu tonight. It’s spiced, but not spicy and it’s perfect for the whole family. A quick dinner for busy nights is always a win-win for me. Keto-Friendly Air Fryer Salmon I absolutely love my air fryer. Okay…at first I hated it, but I’ve come to […]
Keto Blueberry Cheesecake Mousse
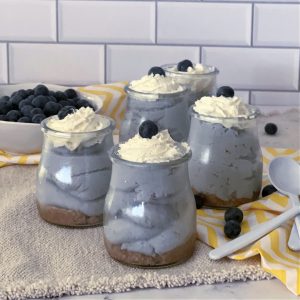
My Keto Blueberry Cheesecake Mousse has the summer flavor you are craving. Only a few ingredients and a packet of Keto Chow creates this light and fluffy dessert that you will make all season long. KETO BLUEBERRY CHEESECAKE MOUSSE I love homemade pudding, so it’s no wonder I love homemade mousse too. Both are way easier to […]
Easy Keto Pancakes (with no flour)
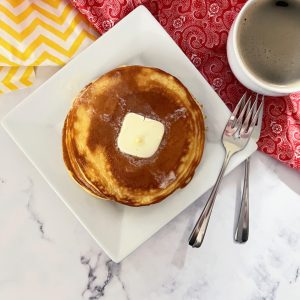
My easy keto pancakes are made with no flour and just a few simple ingredients. They are so good that you’ll want to eat the whole batch and that’s totally okay because this recipe makes one serving. Easy Keto Pancakes (with no flour) I’m on a quest to eliminate a lot of nut flours and […]